

How To Draw An Angry Mouth
Read Time: 10 mins Languages:


In this Quick Tip I will exist showing some useful guidelines you can follow to create the base of a caput with facial features, following that upward with quick tips on how to shape the facial features to create an expression/show emotion!
Step 1: Head Base
Nosotros will commencement by creating a base shape of the head before focusing on the expressions.
Start by drawing out a uncomplicated caput shape, an oval for the skull, two ears, a cervix and the offset of the shoulder. Once y'all've got a shape that pleases you, we will showtime placing in the filigree that will assist us place the facial features. Now draw a vertical line that separates the face in half and brand sure either size are nearly the same width. If one side is plainly wider than the other, arrange them until you are satisfied. Nosotros'll continue by drawing the eye line and the nose line. For the eye line, simply depict a directly line (Line Segment Tool (\) or Pen Tool (P)) from one pinnacle of the ear to the other. For the nose line, depict a straight line from one bottom edge of an ear, to the other. To define the height of the brow line, cutting the section between the eye line and tiptop of the skull into three. Only keep the line closest to the eye line and remember it to exist your forehead line. For the mouth line (that line will define the center/opening of the lips), cut the section beneath the nose line and to a higher place the mentum in half, draw the line and remember it to exist your mouth line.


Pace 2: Features Base
The nose is the one that volition help us with all the other facial features. Using the nose line, shape out the nose you want; Narrow, wide, sharp, circular, etc. The width of the nostrils is a great manner to determine where the inner corners of the eye should begin and where the top lip should commencement to curl down. And when you lot cut that width in half, you lot have a great reference for the temples (they are located on the centre line, started beside the top of each ear).
With the temples created, y'all'll also know where the outer corners of your eyes are located; then, with the inner and outer corners determined, you tin shape out the eyes. For the mouth you want to brand sure to draw the upper lip on top of the mouth line and the bottom lip beneath the mouth line. Finally, for the eyebrows, make sure to have them slightly bowed and that the line is slightly longer both on the inside and outside of the eyes. I and then cleaned upward the base with the Brush Tool (B), colour black, Stroke Weight 0.3pt and the round brush in Illustrator's default brush panel.


Step 3: Smile
Much similar the eyebrows, you want to draw a simple bowed line, the corners going upwards, to define the centre line of the mouth and then shape the elevation and lesser lips to that line. While the eye shape doesn't modify, adding one or two small lines on the outer corners to hint to subtle express mirth wrinkles will add to the expression, since when yous smile, your cheeks push upward.


Step iv: Smile
Here y'all desire to apply the smile expression for a base of operations. To make the oral fissure show some teeth, but motion the bottom lip down and draw a new center line that defines the top of the lesser lip. In the newly created gap, draw some small direct lines for the teeth. Make the crinkles beside the optics more prominent and even add a minor bowed line beneath each heart to show the top of the cheeks pushing up.


Pace five: Surprise
All facial features move upwardly and become rounder/wider. The brows curvation upwards, like trying to shoot its style up into the hairline and considering they do, you want to slightly lift the nose up a scrap since the nose moves along with the eyebrows. The eyes are well-nigh completely circular with the add on of the inner corners of the optics. The oral cavity is the nigh expressive feature in this expression. You desire to make the mouth less wide, merely taller. It helps to create an oval for the mouth opening then draw the lips around that oval (teeth inside the oval).


Pace 6: Sarcastic
The eyebrows practice nigh of the piece of work in this expression, just there are some subtle things happening in the mouth and olfactory organ equally well. Using the smile expression as base, reshape the eyebrows showtime. You can simply use one countenance of the surprise expression, since it goes upwardly simply as loftier. Whereas the other frowns downwards. You want to keep the outer corner about the same pinnacle as the grin eyebrow, but really push button the inner corner down towards the inner corner of the eye. On the same side you have the surprise eyebrow, tilt the nostrils on that side subtly upwardly. As for the mouth, use the original heart line for the smile expression, and tilt information technology upward on the same side as the surprise countenance. Adjust the upper and lesser lip to the newly directed center line!


Step 7: Disgust
Use the sarcastic expression as base for the nose contraction. Both for the center line of the rima oris and the eyebrows, yous want them to be as straight as possible. Create a prominent pout between the eyebrows, since they are essentially pushing together in reality and make sure the eyebrows button down onto the top line of the eye, hugging one another tightly. As for the oral fissure, the bottom lip speaks for itself, whereas the tiptop lip, to really define the expression 'disgust', coil merely ane side (doesn't affair which) of the mouth upwardly.
Tip: If you mix the sarcastic eyebrows with the disgust mouth, you get the expression: Unimpressed.

Pace 8: Laugh
For the express mirth expression nosotros will use the smile expression as a base. Since the mouth opens further than it has so far, we're going to motion the jawline downwardly and at the aforementioned time, move the bottom lip down with it while keep the tiptop lip right where it is. If you're not sure how far downwards you should motility the jaw, utilize the length betwixt the lesser edge of the nose and the start of the upper lip as reference. The top line of the bottom lip y'all can describe by followed the cheek lines. Much like the smile and the grin, you want the cheeks to be prominently apparent as they button up, but to add more than to that consequence, we desire to make the eyes more slitted, as though squinting. To practice this, select the bottom line of the heart, flip it horizontally, and adjust it back to the elevation centre! At that place, y'all've got squinted eyes! We also want to make the eyebrows less neutral past moving the inner corners closer to the bridge of the nose while curving the outer corners upwards equally they originally did.


Footstep 9: Shout
We volition use the express mirth expression hither since the jaw line is already properly fatigued for an open rima oris, which is needed for the shout expression.
For the mouth, don't touch the bottom lip, merely the upper one past bowing the lip downwards, then adjust the bottom lip to the newly shaped upper one. What volition really define this expression is the eyebrows and nose. While the bottom edge of the nose doesn't motion, you want to push the nostrils upwardly, as though they are flaring. As for the eyebrows, the inner corners can be pushed downwards in an exaggerated manner, going as far as touching the span of the nose and even drawing a line to connect 1 eyebrow to the other (without hairs). But continue the outer corners bowed upwards. To make the frown more prominent, draw to pocket-sized lines betwixt the eyebrows to show that the peel is pushing together there.


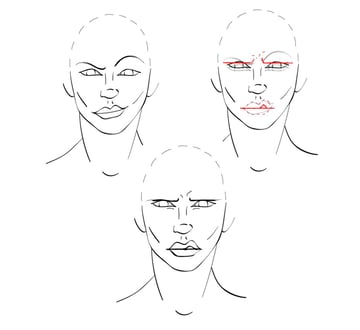
Step 10: Angry
For the angry expression we'll utilise the shout expression as base, since then we can get out the eyebrows and eyes equally they are while only needing to piece of work on the jawline and rima oris. Since the mouth won't be open whatsoever longer, you want to move the jawline back up. As for the mouth, remove the teeth and tongue and then push the upper lip down and the bottom lip upward. Make sure at that place is a small gap left to evidence a sliver of teeth, every bit though gritting the teeth together.


Footstep 11: Sad
Sad is like shooting fish in a barrel after you've created the smiling expression, since for the mouth, all you lot accept to do is flip the center line of the rima oris horizontally so that it bows downwardly rather than upwardly. The upper lip will need to be adjusted a bit, only zip to complex! The eyebrows really help add together to the expression. While the inner corners create a curve, the rest of the line follows the shape of the top line of the center, pointing downwards.


Stride 12: Crying
Using the sad expression, nosotros'll keep the mouth as information technology is and piece of work on the eyebrows and eyes.
While we want to keep the outer corners of the eyebrows where they are, we want to push button the inner corners upwardly. Like the sad eyebrows, create a modest curve on the inner corners and then depict a straight line downwards. Every bit for the eyes, remove the pupils and so button the bottom line upwards to brand them seem more than slitted and then redraw the pupils, pointing them somewhat downwards. People rarely await some other person in the eye when they weep. To add to the expression, you can add two pocket-sized lines betwixt the eyebrows, to evidence the skin slightly pushes together in that location in sadness/worry. And and then because information technology's the crying expression, add some tears!


Pace thirteen: Worry
Here nosotros'll apply the sad expression as base since the eyebrows are in perfect place. You want to add worry lines of the forehead and to help define this expression further, past thinning out the bottom lip, it'll await as though she/he is bitting it in worry when allowing a little scrap of teeth to show.
Tip: If you use the worry lines of the forehead with the eyebrows of disgust, the slitted eyes of aroused and the oral cavity of buss (volition exist shown in the next step), you get the expression: Pensive.


Step 14: Kiss
Yous tin can depict the osculation with open up eyes, just it's not every bit constructive. So, remove the top line and pupil, just go along the bottom line of the eyes. What you want to practise, is thicken information technology a bit since y'all accept the upper lashes and bottom lashes meshing together. Yous want to actually curve the eyebrows, it'll give a relaxed feel to the face, simply the feature that defines this expression is the rima oris. You want to make the lips almost as wide as the olfactory organ, the center lip should bow up a little bit since generally people who want to kiss someone are happy, just, since the lips are pushed together, let there to be wrinkly lines in the center. Two short and curved lines placed on top of 1 another (ane facing upwards for the upper lip and the other facing down for the bottom lip). Drawing a middle tin can help to shape the lips around!


Conclusion
One time you've created the expression you wanted, you can keep onwards to make the hair and add the colors and shades! At that place are enough of nifty tutorials on how to create vector portraits and vector hair correct here on Vectortuts+!
![]()

Source: https://design.tutsplus.com/articles/quick-tip-how-to-draw-facial-expressions-to-show-emotion--vector-6658
Posted by: hamiltonprionat.blogspot.com
0 Response to "How To Draw An Angry Mouth"
Post a Comment