How To Create A Wow Addon
In this guide I will give you a pretty extensive introduction on how to write your own World of Warcraft AddOns. While following this Guide you will write your first AddOn, called WoW-ProFit which keeps track of your money profits and deficits.
You don't need any programming experience if you want to follow this guide, but it would of course be helpful, as I can't possibly explain every nut, bolt and screw. Some talent for independent thinking might be useful, too.
If any questions or problems occur, please feel free to ask me via with Comment.
Table of Contents
- Introduction
- Introduction
- Tools
- What is an AddOn
- AddOn Guide
- Setup
- The Frame
- A Button
- Textures and FontStrings
- Drag and Drop
- Initialization
- Money Matters
- Money Matters II
- Appendix
- What Now?
- Something Missing?
- Images
Introduction
This guide has been written for learning-by-doing, so roll up your sleeves and prepare for hard work!
No seriously, please don't just read the guide an try to memorize something, this would have absouletely no use and it would completely spoil the fun you have while writing your first own AddOn. (That's why the WoW-ProFit AddOn won't be available as a download!)
As you will see, the Guide is based on steps. The steps can consist out of three different « segments »:
| The green segment will have a short introduction on what will be done in this step | |
| The grey segment is the place for XML code-snippets | |
| The purple segment is the place for lua code-snippets | |
| The blue segment contains the explanations for what has been done in the code. |
The star  means that there are some visible changes, so it might be a good idea to look at your AddOn in the game.
The little AddOn you will write during this guide will show you exactly how much money you have spent or earned in the current playing session. Additionally it keeps track over all the session since it's installation and can display the all-time profit/deficit. This is what it will look like:

WoW-ProFit includes pretty much everything that is needed for this «basic » introduction.
Nevertheless you have to note, that this Guide won't give you ALL information you need to write professional AddOns like Cartographer or TourGuide, but it is definitely a step in the right direction
So never despair, keep cool and have fun!
Tools
Everything you need for creating your own AddOns is a simple text editor and, of course World of Warcraft to test you AddOns.
If you want you can follow this guide only with Window's Notepad but I really suggest to use a texteditor that supports syntax-highlighting. The one I recommend and use is
- NotePad++
It's open-source software, and as such free to download. It supports syntax-highlighting for many many languages, including lua and xml, which we will be using. Also it has the possibility to record Macros and a lot of other handy things you will find out yourself
An other quite useful tool, which is completely optional for this guide, is
- XML-NotePad
It's an XML-Editor by Microsoft which comes in really handy if you have to struggle with huge xml-files. I won't explain how it works exactly, so if you want to use it you will have to catch on with it yourself. NotePad++ will suffice for this guide as our xml file won't become too big.
What is an AddOn
As you probably know, an AddOn is a way to customize, modify and extend you User Interface.
Most people know that an AddOn consists at out of one folder and some files.
But only a few people know what is going on inside those folders and files, and that's where we will head in this guide.
AddOns are located in a AddOn folder. The path is:
World of Warcraft\Interface\AddOns\ Every AddOn has it's own folder in there and in every addon folder you will most probably find three different types of files:
- The .toc file:
TOC is the abbreviation for Table of Contents and that's exactly what it is. It contains a reference to every file you want to include to the addon. Also it conatins some parameters which describe the addon to WoW. The name of the .toc file has to be the same as the name of the folder it is in. - The .lua files:
Those files contain (most of) the logic. - The .xml files:
Those files contain the « design » of your buttons, textures, frames etc.
Setup
Before we actually start coding we will prepare the file and order structure. As said above, all our files have to be in their own folder and our .toc file has to have the same name as this folder.
| So, in your AddOns folder, create a new folder called «WoWProFit » and create the following files: | |
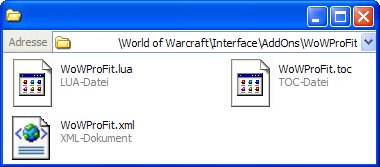 |
| Now open the WoWProFit.toc file and write the following lines: | |
 |  |
| Every line with a ## in the front represents a parameter. There are lots and lots of them. If you really want to learn everything about the .toc file format I recommend you visit the wowwiki page about it. | |
Interface: tells World of Warcraft for which client version the AddOn was written. If you want to know how to get the current number look hereCurrent Interface number: 30300 (07 January 2010) | |
Title: is the title of the AddOn that will appear in the AddOn list at the character select screen. | |
Note: is a description that will be shown under the title. | |
Author: your name | |
| The last two lines are the filenames of the files we want to include to our AddOn. |
The Frame
Now we will create the background and borders for our AddOn. For this we will edit our .xml file and add a Frame. But first of all, a short introduction about XML:
Notes on XML:
If you never programmed before this might need some explanation. XML works with so called tags, you probably already met something similar here on WoWPro if you ever formatted some text.
A tag looks like this: <tag> .
Tags generally get opened and closed again. Closing tags have a slash (/) in the front: </tag> .
Tags can be closed in their opening tag, looks like this: <tag parameter="stuff" /> (note the slash at the end)
As you can see, it is possible (and often used) to add parameters in the tag.
Everything between the opening and ending of a tag will either influence it or will be influenced by it.
Don't worry if you have problems understanding this, it's not very hard. Just follow the guide and everything will explain itself.
| Open the WoWProFit.xml file and write the following lines | |
 |  |
The <Ui> element is the only really needed tag in the .xml file. It just has to be there The <Frame> element, how could it be different, represents the frame we are about to create.We've already given our frame a specific name, with the A prefix like |
| There are three things we need to do before we can see our frame in the game: give it a size, anchor it to a point and create a backdrop. At first we will give it a size | |
 | 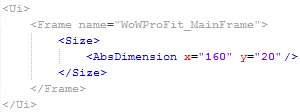 |
The <Size> element contains the size information for the frame. This information can be give with different tags.We use the <AbsDimension> tag which takes two parameters. The width of our frame as x and the height as y . The values given are in absolute pixel. Thats why it is called AbsDimension.Another possibility would have been the The width doesn't really matter in our case, because we will have to set it dynamically later on, but for now we set it to 120 so we will see something. The height of 20 pixel is the final height for the frame! |
| Now we anchor the frame to the center of the screen | |
 |  |
We added a new parameter to our frame, parent="UIParent" . This means that our frame is the child of the UIParent, which represents the whole screen. We'll need this information in the next tags.The <Anchors> tags contain all the anchors of the object. In our case it has only one.Anchors place one point of an object (here the frame) on a point of another object. There are different « versions » of anchors but we just use the simplest of them. Our |
Time for a test-run:
Save your files now and start your World of Warcraft client. Log in and check if this entry is ticked in the AddOns list:

Log into your favorite character and you should see a slightly transparent bar in the middle of the screen

If not, don't be upset, just go through the previous steps again. Adversity is the school of wisdom.
 | Next we want to add some borders to our frame. For this we need a file that contains all edges and sides and have to define their size |
 |  |
The edgeFile parameter contains the path to the file we want to use. This is what our file looks like: As you can see it contains all possible sides and edges for a nice bordered rectangle. Because of this we need to define how the file has to be split. We have to specify the size of the « tiles » we want to make out of this file with the |
 | If you look at your AddOn now in the game you would notice that the background is somehow visible outside of the borders. We can fix this by adding a new element that scales only the background. | |
 |  | |
The <BackgroundInsets> element is used to scale the background. It requires another tag:The |
Very well, the frame is finished, though we'll have to make some dynamical changes to it later on. Nevertheless, be happy about what you've done so far.
A Button
In this chapter we will add the button that will allow us to display the all-time profit/deficit.
We can use most of the things we've already learned from the frame on the button as well, because it is derived from the frame element and therefore is a frame too.
| We have to add a new element that will contain all Objects of the frame | ||
 |  | |
Between the <Frames> tags will be all objects that are somehow derived from the Frame object. Those are for example buttons, as we will use one, scrollframes or editboxes. Of course we could also add other [=14] <Frame> s to the frame.Every object in a |
A button object can easily be added with the <Button> argument which in terms of size and anchors works exactly the same as pure frames. | ||
 |  | |
The analogies of the <Button> element to the <Frame> element are obvious. It has inherited the same parameters and has the same embedded tags like <Size> The Everything else you can see here should be clear. If not search the The Frame chapter for the here used tags. |
| Of course we can't save ourself from the anchoring and this time we need to specify an offset to make it look good in the end. | ||
 | 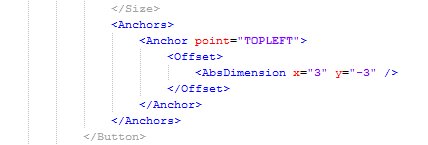 | |
The point of the <Anchor> tag is "TOPLEFT" which only means that the topleft point of the button will be anchored to the topleft point of it's parent (our MainFrame, as explained above)This time we opened the We move the point 3 pixel to the right and 3 pixel down, so that our 15*15 pixel sized button is approximately vertically centered in our 20 pixel high frame. |
 | Instead of a background we will use different textures for the different states our button can have (Normal, Highlighted, Pressed or Inactive). Let's begin with the normal texture | |
 |  | |
The path to the texture we want to use has to be given in the file paramter of the <NormalTexture> tag.The problem with the texture we use is that it in fact is multiple textures in one file: We only want to use the first blue circle thingy as our texture so we somehow have to cut it out. That's where the The same thing applies to the Similar to this work In our case we want to keep the If you have problems understanding this, just play around with the values and look at the results ingame, as you should see the button there by now. |
Textures and FontStrings
Even the <Frame> element has an object it's derived from, the <LayoutFrame> . Now this object is also the parent of <Texture> and <FontString> objects, which we will use now. The fact that they are not derived from <Frame> means that they do not fit into the <Frames> element, we need something else…
| FontStrings and Textures can be implemented in one of five Layers | ||
 | 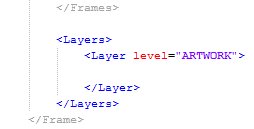 | |
The <Layers> element contains the different layers.The
The level |
 | Let's begin with the text for the gold amount. We need a <FontString> object for this. There is not mouch new here so prepare for some more lines of code: | |
 | 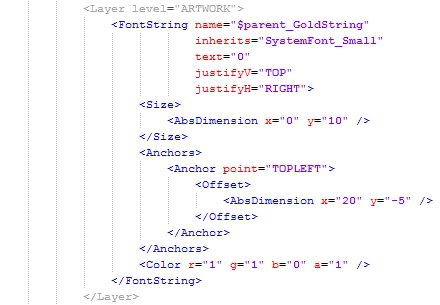 | |
The <FontString> tag creates a new text label element. There are a few new parameters, but nothing too hard.The name given in The text that will be shown is given The Because the profit at the beginnning of a session is 0 we want the text to appear yellow. We can use the |
| Now that we've got the text we want that little gold texture next to it | ||
 |  | |
Not much new here again. We create the texture with the pretty straightforward <Texture> tag and provide a texture file in the file paramter.Even though the files size is not 10 * 10 it will be adjusted automatically. |
 | The anchoring for our gold texture is a bit more interesting as we don't want it to be anchored to it's parent and not even to the same point. | |
 | 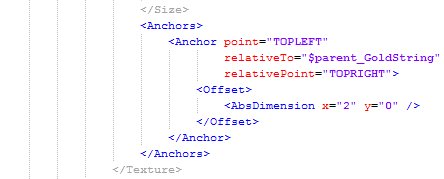 | |
As you can see there are two new parameters in the <Anchor> tag.The We also want the texture to be on the right side of the text. This can be accomplished easily if we anchor the topleft point of our The small horizontal Offset is only for some distance between the two objects. |
 | The silver <FontString> and <Texture> is only copy and paste work. | |
 | 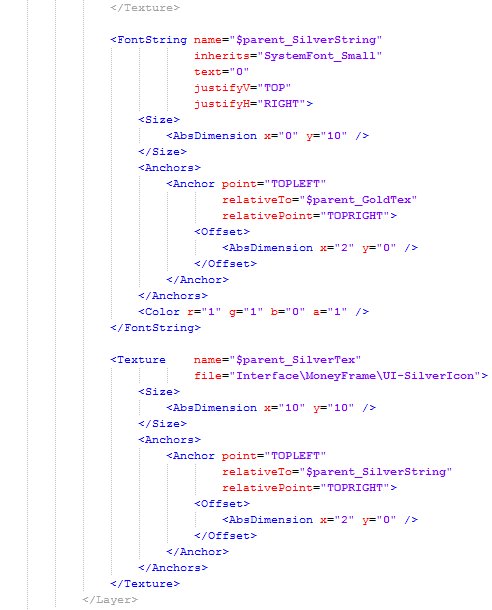 | |
The only new thing here is that <Anchor> of the <FontString> object is relative to it's neighbor texture as well.Changes have been made in the Of course the |
Drag and Drop
Now it's time to implement some interactivity with the frame. As a beginning we want the frame to be dragable.
| We have to add two parameters to our frame, so that it is movable and that we can use the mouse on it. | ||
 |  | |
movable="true" makes the frame movable |
| We want the frame to start moving if we press the mouse button down and we want it to stop moving if we realease it. So we now add two so called Even-handlers. | ||
 | 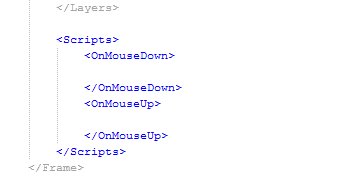 | |
The <scripts> element contains all Event-Handlers for the object it is in. We want the frame to be dragable on click, so we put it into the <Frame> obejct. |
| Now it's tmie to switch into our WoWProFit.lua file and write our first function. This one will make our MainFrame start moving. | ||
 |  | |
The statement function opens a new function and WoWProFit_MainFrame_OnMouseDown is it's name. Again it's a matter of clearness, as this name explains exactly what it is for on the first view.The two brackets The Our frame The function |
 | Now that we've written our functions we can call them in the Event-Handlers. | |
 |  | |
Every time the MouseDown event is fired, it will call our WoWProFit_OnMouseDown() function, and therefore make the frame start moving.Same thing with MouseUp only that it will result in making the frame stop moving. |
Initialization
Some presets and stuff like that we need to sort out while loading the AddOn.
| Three variables at startup | ||
 |  | |
The WoWProFit_LastMoney variable will contain the money before it has been updated, so we can calculate a difference.The The curly brackets indicate that |
The WoWProFit_History table has to be saved, so that we can update it in every new plaing session. For this we need to edit our .toc file again. | ||
 |  | |
The SavedVariablesPerCharacter parameter is a list of variables that will be saved for each character. We want our History to be saved.The saved variable can be found in the file The loading of the variable is one of the last things that happen during the initialization process. That's why we can define it as an empty table, because it will be overwritten with the saved data, if there is any. |
| Now we write a function that is supposed to be executed on startup. | ||
 |  | |
In this function we give our LastMoney variable a value, so that we will have something to compare to on the first money update.The function |
| We don't want our frame to be too long anymore, so we write a function that sets the width of our frame so that it perfectly fits with the width of the FontStrings and Textures. | ||
 |  | |
We create a local variable. This means it is only available inside this function and will be deleted after it's execution. This is a very important way to save memory. Then we add the width of the texts to the total width. You have to know that the right side of an assignment is always calculated first. That's why we can use the same variable left and right. The function We do this three times, for the gold, silver and copper FontStrings. Finally we set the width of our WoWProFit_MainFrame with the |
Money Matters
Finally it's time to make the AddOn do what it is supposed to do; keeping track of profits.
Let's add the <OnEvent> handler in out .xml file and let it call a function. | ||
 |  | |
<OnEvent> is executed with every event that is registered to the frame. To distinguish which one has been fired there is the variable event , which contains the event's name and is available for everything in the event handler.We'll write the |
We write the function we just called in the event handler. It has to check if the PLAYER_MONEY event has been fired. | ||
 | 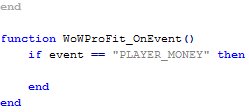 | |
An if clause is a way to check conditions.The If this condition is true, everything between the |
| Now that we definitely have a individual entry for the current session in our history table, we can calculate the money difference and add it to our history. | ||
 |  | |
We can calculate a difference by subtracting the money we had before the change ( WoWProFit_LastMoney ) from the current money, which we get with GetMoney() . We save it in the local variable difference .Now we add the difference to the current state in our history entry. The entry for the current session is the first one, as we added it above. An element of a table can be accessed with the squared brackets with a index number in between. 1 is the first element, which we need. Finally we set the |
| All our «money variables » contain values in copper, but we want it to be seperated in gold, silver and copper. For this we write an own function. | ||
 | 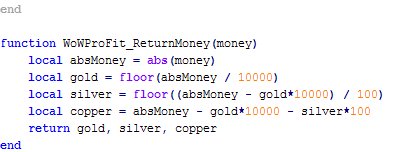 | |
| Aww, maths… With the Now we calculate the gold part of the money. We do this by dividing the coppers by The silver is calculated pretty much the same, only that we divide by The copper part is the Now we return all three calculated values. This means we can say If you did not understand everything, no problem, it's maths after all Such things become clear if you begin developing your own code. |
 | We use this function now to set the text of our FontStrings | |
 |  | |
We give our history entry to the function we've just written and save the returned values in some local variables.We set the text of the gold FontString with it's member function It's exactly the same thing for We changed our text, so it probably is necessary to change the size of the frame. Luckily we wrote a function for that, so we just have to call You can try selling or buying something ingame now and you will see that the profits/deficits are displayed in the AddOn |
 | One thing is miissing.. We don't know if we made profit or not. So we change the color of the FontStrings to green if it's a profit and to red if it's a deficit. | |
 | 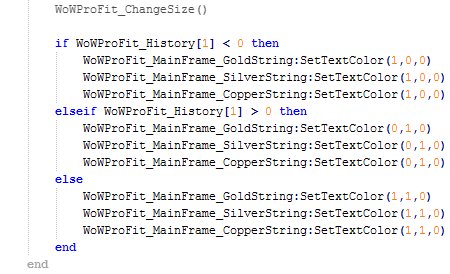 | |
There are only two really new things here. The condition after the elseif statement is only checked if the conditions of the previous ifs or elseifs were false.Same thing with the Oh and |
Money Matters II
Only one thing left, we want the AddOn to print the all time profit/deficit of the character in the chat window by clicking on the blue button.
| Let's write the function in the .lua file. First o all we calculate the all time value with a loop. | ||
 | 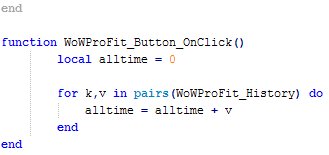 | |
We create a variable called alltime and set it to 0 .The loop we use is a so called Now we can add all the values to our After the loop is finished we have a variable that contains our all time profit or deficit. |
 | We check if we have a profit or a deficit and display a corresponding message. | |
 |  | |
| If the value is negative it means we have a deficit. The function takes a string as a paramter, and in this string we can use so called escape sequences. The one we use is to change the color of a particular part of the text. The sequence If we have a profit ( |
Well done! You've completed the developing of your own WoWProFit AddOn
Appendix
What Now?
Now that you've finished this guide and have written the AddOn you should have learned enough to start programming your own AddOns, so be creative, think about what the WoW-Community could need and go to work.
There is only one problem, and that is that you can't possibly know anything you need just by following my guide. For this reason I will give you some links and ressources that helped me a lot when I learned about AddOn writing.
- wowwiki.com – you probably heard about and used it before. The wowwiki does not only contain informations about game-play issues and lore, it is also a huge knowledge database about pretty much everything you could need for AddOn developing. Nearly every function or event or tag or whatever has an own article with much information. Nevertheless the information can sometimes be a bit cryptic or hard to understand, but you'll make it
- World of Warcraft API – This is a list on the wowwiki that contains all the WoW-side functions for your lua code.
- Widget API – This is a list on the wowwiki that contains all the functions for the Widgets (buttons, frames etc.) for your lua code.
- WoW UI XML Definition – A page by some nice guy who took the time to parse and format the Ui.xsd, which contains the definitions of all the XML Widgets. This is a very good site for loooking up anything concerning your XML code.
- Google – A very good site to look up basic lua stuff, like loops and so on, but also good for everything else, as you probably know
If you have no idea what you could do with your new knowledge you could try to imporve the WoWProFit AddOn, as it has some flaws:
The all-time deficit thing does not make much sense, as you might have noticed. If you use it from the creation of a character it would just show you your current amount of money
You could try to change it so it only shows the last ten history elements. Furthermore you could implement slash commands for it. Or just completely redesign it. Do whatever you like with it, it's completely yours!
If you did improve the AddOn somehow I'd be really happy if you could somehow accord it to me.
Something Missing?
I'm really sorry to tell you but there are some pretty elementar things not explained in this guide. For example I did not explain how to implement slash-commands (/whisper stuff) and hotkeys.
You will have to work this stuffe up on your own. This should be no problem with sites like wowwiki.
Images
Here is a short description on how to get the World of Warcraft internal images and how to get their paths.
First of all you need to get Blizzard's World of Warcraft AddOn Kit. You can get it from this page: Blizzard Support
Download the file for your system and install graphics package. After the installation is finished you will find a new folder in your World of Warcraft root folder called « Blizzard Interface Art ».
This folder contains files of the type .blp. You won't be able to open those files with most of your standard image viewers.
The program I recommend you to use is XnView. It's a powerful and free image viewer that is able to display .blps in pretty high quality.
Now you can look at the images available for your use. The path you have to use in your AddOn is « Interface\ » plus the path relative to the « Blizzard Interface Art » folder. The « .blp » ending has to be left away.
For example the file « Blizzard Interface Art\BankFrame\UI-BankFrame.blp » would be « Interface\BankFrame\UI-BankFrame »
by Jahwo
If you want to use this guide or parts of it on WoW-Pro extern websites, please be so kind to ask me first.
How To Create A Wow Addon
Source: https://www.wow-pro.com/jahwos-addon-writing-guide/
Posted by: hamiltonprionat.blogspot.com


0 Response to "How To Create A Wow Addon"
Post a Comment